Seeing as I've been a bit underactive in the blogoshpere of late, I thought it was probably worth updating you all on what's been going on!
As some of you know, I recently qualified as a primary school teacher, and started teaching my first class in September. Spending every day with 30 ten year olds is certainly very hectic but I'm loving it so far! All the planning, marking and preperation have meant that for now the baking and the blogging are having to take something of a back seat, and I'm really missing my afternoons in the kitchen. Never fear though, I promise that as soon as things have settled down a bit I'll be back to the blogging. And I promise promise promise at least one post during half term (the week of the 24th).
Also, I am trying a gluten free and dairy free diet at the moment, somewhat challenging considering I'm also vegetarian! This is making new recipes a bit tricky to come by, although I'm loving what Chocolate Covered Katie does over on her blog, and am hoping that I'll be able to draw some inspiration from there. If anyone has any other recipe suggestions, I'd love to give them a go too! I also plan to do some mini reviews on some of the lovely tasty things I've discovered so far, so keep those eyes peeled!
About Me
- Alice
- Hi, my name is Alice and I am a self-confessed bake-a-holic. My dream is to one day own a tea room full of gorgeous things, with books everywhere, vintage crockery, and of course plenty of home made cake! On this blog I plan to share all my trials and triumphs from the kitchen, as well as some of my favourite recipes and inspiration that I gather along the way.
Sunday, 9 October 2011
Friday, 12 August 2011
Gluten Free Apple Cake
Been a while since my last post, sorry! Been a bit frantic with sorting out my new classroom *does little excited dance* and having been away to sunny Norfolk! The plan is to resume normal service for a bit now though, although I may need poking with a pointy stick to keep me from forgetting from time to time!
As the more observant amongst you may have noticed, this is my second recent gluten free post. Recently I've been told I may have coeliacs, and I'm part way through the diagnosis route (blood tests then biopsy for those who don't know). Anyway, after a bit of a panic over the things I potentially may have to stop eating, I thought the only sensible thing to do was to have a go at a bit of gluten free baking! I'm hoping that those non gf readers who've made it this far aren't put off though, the recipes can usually be made with wheat flour, and actually are every bit as delicious as 'normal' baking (And no, I'm not just saying that)!

Anyway, here is my recipe for super scrummy apple loaf cake
Ingredients
190g gluten free self raising flour
150g soft butter
175g sugar
3 eggs
1 tsp baking powder
2 tsp mixed spice
2 apples (1 and a half chopped into little cubes, half in thin slices)
- Preheat the oven to 170C
- Grease a standard loaf tin
- Using an electric whisk, mix together all ingredients, excluding the thinly sliced apple. If the mixture does not easily drop off a spoon, add a little apple juice or milk.
- Pour into the greased loaf tin
- Decorate with the slices of apple (and a little soft brown sugar if desired)
- Bake for 10 mins, then cover with foil and return to the oven for another 30 mins, or until a cocktail stick inserted into the middle comes out clean
Monday, 18 July 2011
Birthday Baking
So it's finally happened. My little sister has turned 21. Not only was this a very strange feeling (my little sister a real proper can't deny it anymore grown up?), it also meant a lot of baking for me, as official head chef for the celebrations. Fortunately another friend wanted to make her a big cake, so I was left with cupcakes, millionaire's shortbread, brownie and flapjack. Phew.
So many of you have been really helpful with your advice and ideas that I thought it was only fair to share the finished products with you (links for back stories for those of you who missed me grovelling, and recipes are at the bottom).
 Chocolate cupcake with stars and gold edible glitter


There were 48 pink cupcakes too, topped with lovehearts, hundreds and thousands discs, white cholocate mice and flying sacuers. Yes, I know my icing skills still need some practice, but they tasted good and as far as I'm concerned that's the main thing. Thanks so much for all the help and ideas with these!
On top of these there were the 32 pieces each of millionaire's shortbread (here), chocolate brownie (here) and flapjack (coming soon)
For chocolate cupcakes click here
For the pink cupcake development click here
For the basic cupcake recipe click here
So many of you have been really helpful with your advice and ideas that I thought it was only fair to share the finished products with you (links for back stories for those of you who missed me grovelling, and recipes are at the bottom).


Some of the 48 chocolate cupcakes

Pink iced cupcake with loveheartsThere were 48 pink cupcakes too, topped with lovehearts, hundreds and thousands discs, white cholocate mice and flying sacuers. Yes, I know my icing skills still need some practice, but they tasted good and as far as I'm concerned that's the main thing. Thanks so much for all the help and ideas with these!
On top of these there were the 32 pieces each of millionaire's shortbread (here), chocolate brownie (here) and flapjack (coming soon)
For chocolate cupcakes click here
For the pink cupcake development click here
For the basic cupcake recipe click here
Sunday, 10 July 2011
Millionaire's Shortbread
***GLUTEN FREE ADAPTATION AT THE BOTTOM!***
After a much longer delay than anticipated, here is the most recent blog post, in which I slightly burn condensed milk, make a mess of the kitchen, and consume ridiculously large amounts of sticky sweet stuff. All in a day's work.
Being a serious fan of that crunchy, gooey, chocolatey goodness which is millionaire's shortbread I've long wanted to have a try at making some. An internet search revealed a plethora of recipes, but none seemed to me quite right, so armed with a bunch of them, and a splash of ingenuity, I headed to the kitchen.

I wanted to strike the balance between enough crunch, the butteriness of the base, plenty of the caramel, and just enough chocolate without the taste being overpowering. The eventual destination of the shortbread was the table at my sister's 21st birthday party, so I knew it had to be good.

The recipe I've included below is the one that I adapted and used, and to me, it's about as perfect as it gets. Obviously it may not suit everyone's tastes, and I'm sure I'll have plenty who tell me it should be dark chocolate, but I decided to detail this how I like it best. The rest of you will just have an excuse to make as much as you want to get it 'just right' then, won't you?
The shortbread base

You will need:
125g butter (leave this out the fridge a few hours first)
50g caster sugar
175g plain flour
The caramel topping

You will need:
397g tin condensed milk
50g butter (cubed)
50g soft light brown sugar

You will need:
200g milk cake covering chocolate

Yes it uses a lot of pans, and yes there seems to be loads of waiting in between all the various stages. But as soon as I took a bite, I didn't even mind the piles of washing up.
UPDATE - GLUTEN FREE VERSION!!!
I've recently had a go at making a gluten free version of these yummy squares of goodness. The only part that actually needs adapting is the base, and I replaced the flour with gluten free flour, half plain and half self raising. I also reduced the amount of butter to 100g, and increased the sugar content to 75g. Make in the same way as described above.
After a much longer delay than anticipated, here is the most recent blog post, in which I slightly burn condensed milk, make a mess of the kitchen, and consume ridiculously large amounts of sticky sweet stuff. All in a day's work.
Being a serious fan of that crunchy, gooey, chocolatey goodness which is millionaire's shortbread I've long wanted to have a try at making some. An internet search revealed a plethora of recipes, but none seemed to me quite right, so armed with a bunch of them, and a splash of ingenuity, I headed to the kitchen.

I wanted to strike the balance between enough crunch, the butteriness of the base, plenty of the caramel, and just enough chocolate without the taste being overpowering. The eventual destination of the shortbread was the table at my sister's 21st birthday party, so I knew it had to be good.

The recipe I've included below is the one that I adapted and used, and to me, it's about as perfect as it gets. Obviously it may not suit everyone's tastes, and I'm sure I'll have plenty who tell me it should be dark chocolate, but I decided to detail this how I like it best. The rest of you will just have an excuse to make as much as you want to get it 'just right' then, won't you?
The shortbread base

You will need:
125g butter (leave this out the fridge a few hours first)
50g caster sugar
175g plain flour
- Preheat the oven to 190c
- Line a small brownie tin with baking parchment
- In a bowl, rub the butter into the flour thoroughly, until a golden colour and the bits are an even size
- Stir in the sugar, ensuring it is evenly distributed
- Pour into the lined tin and press down well, right up to the edges
- Bake for 20 minutes (don't worry if it doesn't look 'done', it is)
- Leave this to cool COMPLETELY before the next stage
The caramel topping

You will need:
397g tin condensed milk
50g butter (cubed)
50g soft light brown sugar
- Put all of the ingredients into a heavy bottomed saucepan, and heat gently until the sugar is dissolved.
- Stirring constantly bring to the boil and then reduce heat so it simmers gently for 5 minutes
- The mixture should be a lovely fudgy colour and considerably thicker. I found that mine burnt quite easily, but the darker specs this caused made no difference to the taste or look of the finished shortbread.
- Pour the mixture over the shortbread base (Careful, it'll be REALLY hot)
- Allow to cool (in the fridge) completely

You will need:
200g milk cake covering chocolate
- Snap the chocolate into a bowl above a pan of boiling water
- Melt until smooth
- Pour over the base
- Allow to cool before cutting into squares and removing from the baking paper.

Yes it uses a lot of pans, and yes there seems to be loads of waiting in between all the various stages. But as soon as I took a bite, I didn't even mind the piles of washing up.
UPDATE - GLUTEN FREE VERSION!!!
I've recently had a go at making a gluten free version of these yummy squares of goodness. The only part that actually needs adapting is the base, and I replaced the flour with gluten free flour, half plain and half self raising. I also reduced the amount of butter to 100g, and increased the sugar content to 75g. Make in the same way as described above.
Sunday, 19 June 2011
More Birthday Cupcakes!
With less than 2 weeks to go until my sister's 21st (exciting!!!!), I've been having a go at some more practice cupcakes for her party (see here for the chocolate cupcakes I tried a while back).
As well as the scrummy chocolate ones (I've bought some edible glitter to decorate those next time, so some glittery and some with the stars), my sister wanted some cupcakes with her favourite childhood sweets on top. After some deliberation, she decided on flying saucers, chocolate mice and jelly beans on top of standard vanilla cakes with buttercream.
To make them, I used the basic cupcake recipe here before swirling with buttercream and sweets. And here are the results...

Not the neatest icing in the world (I was in a hurry and Florence was pestering me for one to eat) but you get the idea :)
Having made them, we're contemplating replacing the white mice (look a bit anaemic!) and possibly choosing another type of sweet to add variety. She doesn't know what to choose, anybody got any suggestions?
Monday, 13 June 2011
Chocolate cupcakes!
It's been much longer than I intended since my last post, but I've been busy busy busy with all sorts of things this week! I was invited to 3 interviews, but it turns out I got the job on the first one, yay! I don't start officially until semptember, but when I do there'll be a lovely class of 30 with my initial in their class name (I'm hoping it'll be 3p or 4p, but could be year 5 or 6, scary thought) beaming at me and waiting eagerly for their first lessons. I wish.
Anyway, what with all that baking has taken a bit of a back seat, but with my sister's 21st party less than 3 weeks away now, and me baker in chief for the event, I thought it was about time to get cracking on some practice attempts. What a good excuse to fill the house with cake!

This weekend it was the turn of some chocolate cupcakes. I used the basic cupcake recipe here, replacing about a tablespoon of flour for cocoa powder. When the cupcakes were cool I iced them with buttercream made from butter, icing sugar and cocoa powder (I normally do this by eye, adding more sugar until the consistency seems right rather than measuring out ingredients) and topped with some white chocolate stars.

Definitely need to work on my icing skills I think...
Oh, and whilst you're here, any other suggestions for these?
Tuesday, 31 May 2011
Vintage penguins
As well as baking and making, I do love my old things. Not in a creepy sugar daddy kind of a way, more in an old teapot and vintage dresses kind of a way. Items with history have a story all of their own, which I suppose makes it two stories in the case of old books.

I've always loved old books, that smell (I always back it in the old vs new book smell debate), the yellowing of the pages, and the worn corners which suggest all the people who've read it in the past. I got into old penguins in particular a few years back, after realising that not only did they look pretty good on a shelf together, they are also a relatively affordable way into old book collecting.

Ebay has not helped this minor obsession of mine, and I must admit to recently having been on something of a book splurge. So far I've ordered over 50 books in the past fortnight. Oops. As I wait with anticipation for the larger lots to arrive however, I thought I'd share with you all some pictures of what I've got through so far.

Friday, 27 May 2011
Vegetarian cookery books
One thing that most of you won't know about me is that I have been vegetarian since the age of 6. I simply came home from school one day and informed my mother that I wasn't going to eat meat anymore. I'd always had very clear moral standpoints on things (or been stubborn as my parents put it), but this must have come as quite a shock to her considering that nobody else in the family was vegetarian, and nor were any of my friends at the time. I was lucky in that they were very supportive, and in fact my parents often choose the vegetarian dishes in restaurants now! Along the way I have met a lot of people who assume that because I'm vegetarian I'm of the militant variety and want to 'convert' them, which is not my style. I might encourage them to try vegetarian food, but only to prove that it can be every bit as tasty, and, if I'm honest, to show off my cooking skills.
Anyway, as National Vegetarian Week draws to a close, I thought I'd let you in on some of the best cookery books I've found, ideal for having a try or for ideas to feed to those guests you don't know how to cater for!
This book is amazing! Being Good Housekeeping every recipe works perfectly, and it's full of useful advice. Don't be deceived by the title, the recipes are good for adults too, just scale up the portion sizes a bit. Especially good are the toffee pie and bean and parsnip pie.
Another brilliant book of veggie recipes. This book has lots of great ideas for entertaining, perfect for non vegetarians suddenly faced with veggies to cater for at a dinner party! Try the raspberry and mascarpone sponge. Scrummy.
This is probably my pick of the bunch. An all rounder that has meals on a budget, baking, and entertaining ideas, all in a really easy to use format. Vegetarian cookery is a great deal cheaper than cooking with meat, and my non veggie university housemates were thrilled with this book, which got used nearly every day. Too many good recipes to choose from, you'll have to buy it and pick your own!
Thursday, 26 May 2011
A bit more about me
So, I've put up a few posts now, and I thought it was about time that I told you all a little bit more about me. My name is Alice, I'm 23, and I'm from Hertfordshire in the UK. I've trained as a primary school teacher, but at the moment am enjoying a few months of freedom before plunging into that hectic world!
Making things, and especially cooking has always been a passion of mine. My family aren't historically that into their kitchens, so I haven't had one of those idyllic upbringings where baking cakes with mum or grandma was a regular childhood experience, but I have always spent a lot of time trawling recipe books and admiring the pictures! As a teenager I was more into cooking main dishes, but the baking addiction really started when I went off to uni and lived in a house full of cake-a-holics! Baking was a daily activity and a really social thing, and I increasingly realised just how much I enjoyed it.
My favourite thing to bake is probably chocolate brownie (hence the first post!) but baking anything and everything makes me happy. Lots of happy family holidays in Snowdonia and a love of all things vintage got me thinking how lovely it'd be to run a tea shop one day amidst the mountains, but that's a long way off at the moment!
The plan is to use this blog to share with you what I'm baking and making, and hopefully as a way other people can share suggestions, ideas and advice with me (I have such a lot to learn, how to do those neat buttercream swirls on cupcakes for example) so I'm looking forward to a long and happy blogging future!
Wednesday, 25 May 2011
Super Summer Cupcakes
So eventually it's time for the first post actually about cakes! Super summer cupcakes at that! I looked at the weather this morning and was over the moon to see the sun shining, hardly a cloud in the sky and the wind a bit less gusty than it has been. All this made me feel incredibly summery, so I put on a pretty summer dress and got to work on some summery looking cupcakes to enjoy in the garden this afternoon with a cup of tea from my lovely new teapot.
First off, I think it's really important to have a good recipe for cupcakes. You can put what you like on the top, but if the cake itself isn't up to scratch it's going to be a bit depressing. I always use the same recipe for my cupcakes, and it's an adaptation from a Delia recipe.It's quick and simple, makes 12, and they are always deliciously soft and sweet and airy. Unless you forget the baking powder, which I of course have never done *ahem*.
90g self raising flour
90g sugar
90g very soft butter (or margerine)
2 eggs
1/2 tsp baking powder
1tsp vanilla essence
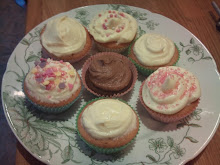
As I said, a piece of cake. Literally. If you follow this, you should end up with 12 cakes which look something like the picture below (don't know what's happened to that huge green one at the back, but bagsy it's mine!).

To make them into super summer cupcakes (and because I happened to have a tray of mixed berries in my fridge) I swirled on some buttercream and topped them off with halved strawberries or a few blueberries like so...

Perfect for a summer picnic or afternoon treat, if only someone would make me a cup of tea to go with it!

First off, I think it's really important to have a good recipe for cupcakes. You can put what you like on the top, but if the cake itself isn't up to scratch it's going to be a bit depressing. I always use the same recipe for my cupcakes, and it's an adaptation from a Delia
90g self raising flour
90g sugar
90g very soft butter (or margerine)
2 eggs
1/2 tsp baking powder
1tsp vanilla essence
- Preheat the oven to 170c and place cake cases into a bun tray
- Put all the ingredients into a bowl and mix using an electric mixer
- Spoon into baking cases
- Bake for 15-20 minutes until golden
- Cool on a wire rack
As I said, a piece of cake. Literally. If you follow this, you should end up with 12 cakes which look something like the picture below (don't know what's happened to that huge green one at the back, but bagsy it's mine!).

To make them into super summer cupcakes (and because I happened to have a tray of mixed berries in my fridge) I swirled on some buttercream and topped them off with halved strawberries or a few blueberries like so...

Perfect for a summer picnic or afternoon treat, if only someone would make me a cup of tea to go with it!

Tuesday, 24 May 2011
My teapot!
OK, so this is the 3rd post and still no cakes! Sorry! Chocolate brownies is about the closest I've got so far, but I assure you there will be some cake based updates soon (and it really is a good brownie recipe).
Today I just wanted to share with you all a new teapot that I own!

Today I just wanted to share with you all a new teapot that I own!

Ta da! Isn't it lovely? Oddly it came with 5 saucers, 4 side plates, 2 larger plates and 1 bowl. Not entirely sure what I'll do with that combination of crockery, but I'm sure inspiration will hit me.
As you'll know if you've read the 'about me' bit (testing your loyalty now) my ultimate dream is to own a little tea shop where everything is served in vintage and mismatched crockery, but the garden will have to do for now.
Maybe some iced fairy cakes tomorrow to serve on those plates. Anyone for tea?
Bunting!
Does anything beat some bunting decorating a garden at a summer tea party? (apart from the cupcakes and brownie, obviously). I've wanted to have a go at making my own bunting for a while, and so I thought I'd give it a stab! I decided to stick with just 2 different materials for my first attempt (I'm easily confused) and picked them and my ribbon up from a local market for £5 a metre (the ribbon obviously was cheaper).


To start with, I just hacked at the fabric in order to create what I hoped were triangle type shapes. Perhaps unsurprisingly this didn't really work, so I set about making me a template to pin on and cut the triangles out. It did take me a while to get my head around making sure that the pattern went the same direction on all the triangles (I began to regret buying stripes) but once I'd figured that out I ended up with lots of lovely equilateral triangles (about 18cm on each side, if you're interested).

Next job was to put the triangles back to back and sew them together to get double sided triangles. I did this with a zig zag stitch. I had however managed to lose the sewing machine instructions, and not having used it for a bit this took quite a while to figure out. Still, I got there eventually. Once this was done I pinned, then sewed, them all on to my ribbon. Et voila...

...my first ever bunting!
Hopefully the first of many, and I'm certainly lusting after this book for some inspiration for next time! Bunting (Twenty to Make)
Monday, 23 May 2011
Chocolate Brownies
I've spent a while struggling to find a brownie recipe that works consistently, is straight forward and of course results in perfect chocolate brownies! This is the best I've found so far, not too gooey and not too cakey and more or less bang on in the chocolatey stakes. It makes about 12 decent sized brownies, or more if you want to cut it into little bites. The baking tin I use is 20cm by 30cm, but a slighter smaller tin would be fine too, it would just give you thicker brownies that take a bit longer to cook (see advice at the bottom on how to tell when the brownies are done). Oh, and it tastes especially brilliant just out the oven with a good scoop of ice cream :)

75g Margarine (butter works too, but it does take longer to melt)
340g dark brown sugar
2 large eggs, beaten
165g self raising flour
65g cocoa powder
1 tsp vanilla essence (almond essence also tastes good)

The real trick when it comes to telling if the brownies are cooked is in my experience the 'talking' and the wobble tests. When you take the tray out of the oven, carefully tilt it from side to side. If it still looks like it's moving under the surface then it probably needs longer. Also, hold it up near your ear (carefully, singed ear doesn't do much for the flavour) and if you can still hear the mixture 'talking' it isn't quite done yet.
The hearts on the borwnies in the picture were owing to a charity event I baked them for and were simply drawn on using a glitter icing pen.
Happy baking!

75g Margarine (butter works too, but it does take longer to melt)
340g dark brown sugar
2 large eggs, beaten
165g self raising flour
65g cocoa powder
1 tsp vanilla essence (almond essence also tastes good)

- Preheat oven to 170c
- Melt the margarine in a pan over a low heat, remove once all melted
- Using a wooden spoon stir in the sugar
- Stir the beaten egg and vanilla essence into the mixture
- Gradually stir in the flour and cocoa powder, taking care to avoid lumps
- Pour into a baking tin (no need to grease or line) and spread out evenly
- Cook for 30 minutes (see below)
- Cut up and remove from tray whilst still warm
The real trick when it comes to telling if the brownies are cooked is in my experience the 'talking' and the wobble tests. When you take the tray out of the oven, carefully tilt it from side to side. If it still looks like it's moving under the surface then it probably needs longer. Also, hold it up near your ear (carefully, singed ear doesn't do much for the flavour) and if you can still hear the mixture 'talking' it isn't quite done yet.
The hearts on the borwnies in the picture were owing to a charity event I baked them for and were simply drawn on using a glitter icing pen.
Happy baking!
Subscribe to:
Posts (Atom)